Monday, February 23, 2009

Finally Getting Somewhere

After a serious amount of hankering and running around in circles, the contraption game has kicked off. The original script, being too vague has been replaced with a more definitive one with significant help from Nitin and some from Kaeyur too. I am attaching the original sketch that I drew up.
The Script consists of the introductory level of the game, divided into 5 sublevels.
  • Objects involved : in this level are are a ball and a domino.
  • Objective : Hit the Domino with the ball.
  • Elaboration : The starting position of the ball is atop the inclined pedestal. Using various building blocks from the vault provided, the player has to provide a pathway for the ball to go and collide with the domino.
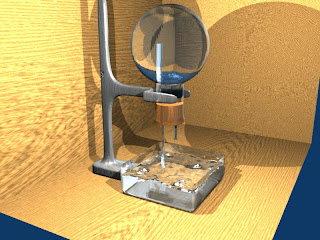

LEVEL 1A:

The ball starts atop the pedestal with the target domino directly in its line of motion. All that the player has to do is add the ramp to allow the ball to smoothly slide down.


The image alongside shows the level being played in the Game Engine.

LEVEL 1B:

The idea here was to raise the target domino onto a pedestal itself so that the player has to add 2 facing ramps allowing the ball to climb up. Here is the first cut :


Both the starting and ending pedestals are at the same height. What Nitin and I discovered is that since the Game engine provides real world physics, the potential energy of the ball is not conserved, which is why it cannot climb upto the original height. (The ball in the GE mode on the right is at its highest attainable height). So we tried to overcome the damping effect on the SHM by setting damp and rotdamp to 0, to no avail. On Nitin's advice I posted the problem on Blenderartists.org where I got a temporary fix:


The height of the starting ramp is increased, fixing the problem.


LEVEL 1C:


The target domino is shifted out of the line of the ball's motion.


One simple solution for the player is to add the pamp and a few dominoes in such a way that consecutive falling of the dominoes finally hit the target domino (highlighted in pink).


LEVEL 1D:


The domino, out of the ball's path has been raised onto a pedestal. The player can add 2 facing ramps and dominoes to overcome this. The level has not been completed due to the same problems faced in level 1B, and will be posted when completed.


LEVEL1E:

The final stage of Level1. The target domino is in the ball's direct path but is atop a flight of stairs.
One simple solution is to add dominoes on each step so that due to the 'domino effect' the target domino falls.


Another idea that I had is to have a camera fly through (as seen tby the ball) in case the player has successfully placed the blocks. The idea is to play the contraption in perspective view if the arrangement is not accurate and then directly have the fly through if the target is going to be hit, so that the player directly knows he has succeeded the moment the fly through begins. A minor variation to the standard way of things, this remains to be discussed with my team

Another important thing is the deadlines. I am reposting the original schedule here :

8th January - Create a Wiki space.

12th January - Survey of games by Bhairav and team.

18th January - Design of Interface to be submitted.

23rd January - Script of the Game

7th February - Modeling of Objects

14th February - Texturing of Objects.

21st February - Lighting

7th March - Game Engine and scripting

28th March - Rendering Starts

5th April - Testing of game

15th April - Final Product

Although we have been off, I think we can be back on track before the 28th March deadline for the commencement of rendering.

The lack of documentation shall be made up for too, so expect frequency of posts to go up.

Chirag Nitin and Kaeyur.

VIDEO SEQUENCE EDITOR

Well you all must have read gokul's mail regarding our doubt in fluid simulation. To quickly bring everyone upto speed - our problem was that we did not know how to bring additional objects into the ongoing animation from a particular(desired) frame.

I was reading to find a solution to our problem and i came across the video sequence editor. It is basically an inbuilt feature in blender which is analogous(if not better) to windows movie maker.
It allows you to split, combine, slow down,etc etc basically anything to do with making a movie.

So i used this feature to solve the "two different coloured ico spheres falling into a container one after the other(basically after desired frames)" problem. The animation is basic and i have not given any subsurf or any textures or tried to work on the lighting. It is solely to illustrate the solution.

The screenshot of the video sequence editor is shown below.
-The top right portion displays the preview
-The top left portion is the ipo curve editor
-The middle portion is the video sequence editor
-The bottom portion displays the timeline


You have to go to the "add" in the video sequence editor portion of the screen to add either an image, or movie, or your baked files. So there is alot of flexibility and alot of options. You can play your file in slow motion by setting the frames/sec field in the "playback" option.

The final output can be in a number of formats as always. The important thing to remember is that in the "render buttons" the "do sequence" option needs to be selected.


The final animation:

Saturday, February 21, 2009

Fountain Experiment's Model

After a week long effort towards modelling, we have at last satisfactorily finished the modelling aspect of the Ammonia Fountain Experiment.
While modelling we faced various problems and tried solving them in the ways as described ahead, but if someone knows the exact reason of these problems and how to solve them in a more satisfactory manner, please feel free to notify us. Here are the problems:
1) We had already made 1 hole in the cork. In order to make the 2nd hole, we decided instead of actually modelling it, we could just delete half of the pre-existing cork and then mirror it. This seemed like a simple solution until the mirror effect started giving us problems as the new mirrored portion was overlapping the already existing part. We had to actually make the new mirrored part a separate object, select its faces manually rotate it to fit de existing half and then join the two objects.
2) The glass material that we are using gave us some problems. The cork and the glass pipe that are inside the flask were not visible and black in colour. After some R&D on Google, we found out that by switching the shadow tab off in the materials panel of an object disallows it to have any shadows cast on it. Hence we switched it off for the cork and it stopped receiving the glass flasks shadow and as you can see in the final rendered image, it looks quite fine.
3) Again similar issue with the wooden table and the glass dish below. We had to actually cut the wooden table's part under the dish, make a new object (plane) in its place and assign it the no shadow receiving property as we wanted the rest of the wooden table to receive shadows.

Thankfully we managed to fix these issues satisfactorily and here is the final rendered model and its corresponding mesh images in blender.

Here is the list of objects modelled:
1) Round bottomed flask
2) Water dish
3) Two holed cork
4) Glass Pipe
5) Syringe
6) Stand

Also the materials that we have used are make do and will be changed or modified if required. Please go through the model and post your inputs.

Monday, February 16, 2009

Problems with fluid animation in fountain experiment !!!

After 6-7 hours of agony we have come to the conlusion that , we are dealing with an area of blender which has little documentation , loads of bugs , slow development cycle and very useful to our experiment.

Fluid simulation seems to be working differently on different machines , differently in different versions and also there are some settings which we still have to understand.
For example each time the ratio of the total volume of the fluid in the simulation to the total volume of the cuboid (domain) goes below a certain threshhold , the baking doesnt happen. Now this is a major bottleneck to our project. Either we bake it in a different scene and use it in the complicated scene or we learn how to break down the animation into multiple domains to simplify.
the following are the bugs we have come across while playing around with fluid simulations :

a) viewport doesnt show properly the mesh data.
b) obstacles when intersecting or too close to one an another , baking doesnt work.
c) init shell doesnt work when objects are too complicated.
d) sometimes obstacles dun behave as proper obstackles.

the following images shows the bugs we discovered :


So now our model with the flask and jet through cork wasnt working with fluids , no matter what we did. So we tried to animate the fluid without the model , just using a dummy model in a different blender scene. we could manage to bake it after a lot of trial and error and we hope to get the fluid animation from this scene to work in our original scene. the following are the screenshots of the new dummy scene we made to make the fluid work.


hope somebody can shed light on why blender doesnt bake fluids in our original scene. Also if some one can find any link or ebook which has documentation on blender fluid simulations. any help would be great.

regards
gokul menon

Sunday, February 15, 2009

Modelling Progress


Progress in Modelling and Texturing :

Progress has been made in modelling..finally, and the materialisation of the game seems a lot more feasible. the models have been found on various noline repositories and have been suitably modified. nitin's first contraption has been made, and the few glitches have been solved to an extent. The 'Anisotropic' button is used to reduce friction in specific directions. Reducing friction friction in the z direction thus makes the bowling pins behave more realistically. Further progress will be posted subsequently.

Chirag Nitin and Kaeyur

Friday, February 13, 2009

Ammonia Experiment Storyboard

We prepared the story board for the experiment as sir had told us to do.
made it into a ppt , have embedded it here as follows.

Thursday, February 12, 2009

Ammonia Fountain EXP Modelling

Gokul & I, alongwith learning the python tutorials decided to start the modelling of the selected experiment. We decided to model the glass flask, the glass jet and the rubber cork without the appropriate textures for the day. We finished the modelling and thought we should try baking a scene where the water goes through the glass jet and comes out into the glass flask. After several hours of trying the same, we did not manage to do so. We are experiencing the same problem we faced last sem. The problem is the water does not pass through the small glass jet. It either does not bake or does not obey laws of physics. If anyone has a solution please PLEASE let us know as we intend on finishing the modelling soon and wish to start the animation.

The following are the pictures of our work today.


Tuesday, February 10, 2009

Water falling in a glass bowl (revisited)

I remember doing my 1st blender fluid simulation of a water sphere falling inside a water mug. its been a long time since then and i have decided to go back to basics for the ammonia experiment. I just realised that i can use single walled meshes for my flasks and trough instead of the agonizingly complex double walled mesh we are used to creating as blender isnt able to calculate the necessary fluid simulation co-ordinates when fluid is to flow inside or outside the object. But if the init shell option is turned on for an object acting as an obstacle then this difficulty can be overcome. That is what i have done in the following simulation. i made a simple uv sphere , cut it open in half and let it remain a single walled semi circular shapped flask. then i poured fluid into it. the uv sphere acts as obstacle with init shell option turned on. the domain is as usual a big cube. the following picture shows the mesh :
the result is as shown in the video :

this is an interesting development i believe , because if we manage to work with single walled meshes , then our work is reduced to half. its like suppose the project was to one has to count all the leaves in a given tree , then i guess this discovery is analogous to that of finding out that the tree is perfectly symmetrical along one of the axis which efectively reduces the work by half.

regards gokul

Friday, February 6, 2009

Fountain Experiment Script

SCENE 1: APPARATUS INTRODUCTION
Step 1: Introduce Flask, 500 cm3 or 1 dm3 which is completely dry and filled with ammonia
Step 2: Introduce Two-holed rubber stopper to fit the flask fitted with a glass jet
Step 3: Introduce Plastic syringe (10 cm3) half filled with water.
Step 4: Introduce Trough or large beaker which can hold more water than the flask and filled with a mixture of water and an acid-alkali indicator (e.g. Universal indicator)
Step 5: White board or sheet of card to act as a background to improve visibility

SCENE 2: APPARATUS SETTING
Step 1: show inverted flask on who’s entrance the two way rubber stopper has been placed and the syringe has been placed inside the 2nd hole of the rubber stopper. The end of the glass jet with the smaller bore is show inside the flask and the one with the bigger bore is kept free for the moment.
Step 2: The end of the jet with the bigger bore is placed dipped inside the liquid in the trough as shown in the diagram and the white background is placed behind this whole arrangement.


SCENE 3: THE DEMONSTRATION
Step 1: Use the syringe to squirt a few cm3 of water into the flask and gently swirl to dissolve some of the ammonia gas.
Step 2: As the gas dissolves, a partial vacuum forms inside the flask and the external air pressure will force water up the tube and through the jet - forming a fountain (see first diagram). The ammonia gas dissolves in the water emerging from the jet and the indicator changes colour.
Step 3: The fountain continues for some minutes, depending on the size of the flask and the width of the jet. When the fountain finishes, a bubble of gas remains. This is air and its volume gives an indication of how well the flask was originally filled.

Fountain Experiment Schedule

Tentative schedule for the fountain experiment (class 10) is as follows :

28th January - Script of the Experiment
7th February – Python Study
14th February - Modeling of Objects
21st February – Fluid Engine .
28th February – Game Engine and scripting.
7th March – Texturing of Objects.
28th March - Lighting and Camera.
5th April - Rendering & Testing of Experiment.
15th April - Final Product.