While working on Assignment 2, that is about Spot light. When i started with the assignment i first thought, i should know how spot light works, than it will be easy to continue with assignment. So this is about how Spot light works, casting shadow and its different parameters few of them i have earlier mention in my previous post.
Casting Shadow :
In Materials Button
Materials which should cast shadow must be set with the "
Shadow" button ON. By enabling this button, Blender calculates the shadow cast by this
object.
Materials which should receive the shadow of another object should have the "
Shadeless" button set OFF. By enabling this button , Blender won't cast shadow over this object.
In Lamp Buttons
The only lamp type that can be used for casting shadow is Spot.
The Spot lamp should have the "
Shadows" button set to ON then Soot light can cast shadow and light.
The spot lamp could be set to "
Only Shadow" if there is another light in the scene. The Spot then ONLY cast shadow but not the light.
The default blender lamp is the lamp
which doesn't cast shadow,so to cast shadow we have set at least one light source as a SPOT. Among all the types of lamps, the SPOT is the only light source that can cast shadows.
In Render ButtonThe shadow button should be set to ON.
Basic
In order to calculate shadow, Blender uses the shadow buffer algorithm, that is the scene is rendered from the point of view of spot and that Blender calculates which object is placed before the other on its line of sight, thus defining which pixels,"hidden" from the spot view by anyone object, will receive shadow in the final render.
If there are many Spots in the scene, Blender ''renders ' the scene as many times, from each Spot point of view, and store the result in its shadow buffer.
After this we deal with different parameters which we have to set individually.

This is the originally view without changing any parameter.
1. Spot of the shadow buffer (Bufsi)As i have said before, information about pixels that get light or shadow is stored in a buffer, which acts exactly the same a rendered picture. This means that shadow buffer has its own resolution. By default Blender's buffer size is 512x512 pixels
here u have just taken a rectangular solid to explain changes in parameter which effect shadow casting.
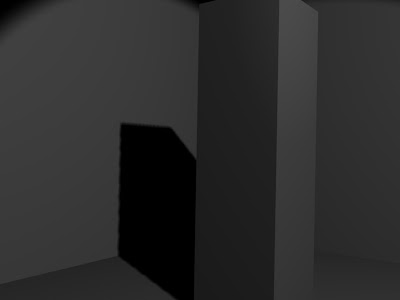
this is with Bufsi=512

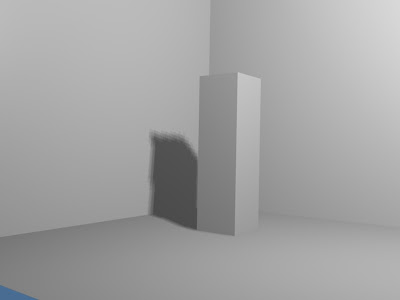
this is with Bufsi=2048
as we can see changes very clearly, in first image the shadow is blocky, i mean the borders are not perfect it dissolves into small blocks, which doesn't give perfect outline. in second we have increase Butsi to 2048 and there is perfect outline to the shadow.
When we increase the Buffer Size, the shadow gets more accurate borders, which is better for close shot of an object and its shadow. Butsi behaves exactly as the resolution of a render picture does.
2. Size of the Spot(SpotSi)
The angle beam of Spot also has a great effect on the look of your shadow.
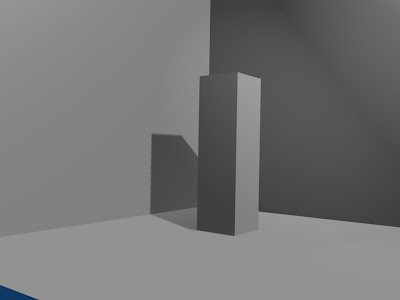
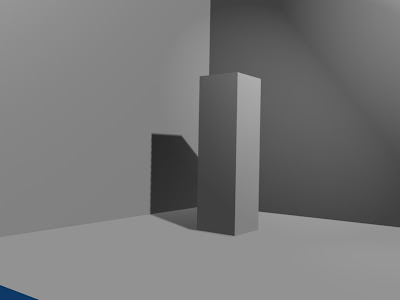
i am increasing light energy to 1.5 so we can have a little bit bright look and changing Butsi and Spotsi.

with default value, SpotSi=45, Shadow buffer size=512
SpotSi=120, Shadow buffer size=512

SpotSi=60, Shadow buffer size=2048
The smaller angle of beam is, the sharper the borders of the shadow are. Before setting the BufSi to any higher value, first enhance the quality of your shadows by setting the SpotSi value as small as possible.
3. Samples
Here if we dont to set Buffer size too high, for that we can use samples (default value 3). Without increasing Buffer size too high we can give a smooth outline to shadow by increasing samples value.
4.Only shadow and Energy Button
we used Spot to cast both shadow and light. Because of that we can see spot light on both floor and walls. If we want to dissiciate shadows from light source it can be done. Instead of putting Spot light, put few hemi or lamp, after getting proper light in the scene, put Spot light, in which turn ON "
Only Shadow" button. After this Spot will only cast shadow and it wont add any light to the scene.
The shadow deepness increases dramitically in order to compensate this, we can change the energy value of the spot.
Spot energy=1
Spot energy=1.5
5. Soft
This defines the size of the area being sampled. the higher the value, the smoother the border of the shadow. In all previous renderings, Soft was set to 3. using a low soft value like 3 is perfect most of the time.
6. Bias
sometimes strange patterns appear in the shadow area. To prevent this, set Bias to the highest value possible like 5.
7. Clipsta and clipEnd
These two parameter set how light and shadows are dealt with in the Spot vicinity. They are visualized by apink segment running along the spot direction. Every face of any mesh closer to the Spot than the Clipsta value has light, and the every face of mesh beyond the ClipEnd value has shadows. Any face of mesh between these two has its pixels given a light or shadow value according to the data stored into the shadow buffer.
1. set the range between Clipsta and ClipEnd the smallest possible.
2. set the Clipsta highest possible.
Final conclusion
1. try to set Spotsi within 45 and 60 degree, avoid setting above 90 degree.
2. set samples to 5.
3. try to set BufSi to 700 to 1024.
4. set the range between clipsta and clipEnd thye smallest possible, set clipsta the higest possible.
5. set soft to 3.
6. set Bias to 5.
This is all about casting shadow with Spot light, working and its parameters.
Nitin Ayer.


